I’ve seen many “textured” manicures in magazines and on various social media sites so I figured I’d give it a go… preeetty successful if I do say so myself!!
All you need is a few simple products:
1.) (optional) Base Coat (Revlon: Quick Dry Base Coat 955)
2.) Nail polish colour of your choice (I chose OPI in Care to Danse?)
3.) Your Texture (I used Essence: Effect Nails in Pearl – found at Shoppers Drugmart, super inexpensive)
4.) Top Coat (Wet N Wild: Wild Shine Clear Nail Protector 401A)
Simple Steps:
1.) Apply your base coat and allow to dry. I usually apply base coat before painting my nails for a full manicure effect, but it shouldn’t impact your texture whether you apply a base coat or not.
2.) Apply your polish solely to the nail you wish to add texture to, allow for the polish to become tacky (by waiting a couple seconds for it to begin the drying process) then sprinkle on your texture. I sprinkled mine over a bowl, but a piece of paper or magazine will do the trick to save excess to be reused, or to prevent a mess! Repeat this process upon every nail that you wish to add texture to then allow for a few moments to settle in and dry. NOTE: if you do not wish to have a colour underneath your texture you can use top coat instead of polish for the above step.
3.) Apply your polish to the rest of your bare nails, give time to dry in between coats.
4.) Apply your top coat – very carefully – upon your texture, but sure to have ample lacquer on the brush to avoid pulling your texture along the nail. Then allow to dry and apply the top coat on the remaining nails for a glossy finish!
And that’s all it takes, it’s really quite simple for something that looks like it took a great deal of effort! Give it a try and let me know what kinds of textures you decided to use (: !!
I had “The Prince” which is: Signature chocolate buttermilk cake, dreamy blue vanilla frosting, & chocolate shavings. It was delicious, and I’m not usually big on cakes and other baked goods, and even when I am, I’m not a huge fan of icing, BUT WOWWW this icing was so delicious! I checked out their website when I got home later today and noticed they have daily “Chef Specials” and a Menu of their regular and seasonal flavours.
Their two locations are in Oakville and Burlington where the address can be found on their website: Cupid’s Cupcakes
I would definitely recommend checking out their website and flavours before going into the store, as they only have a select number of flavours in each day (the cupcakes and made fresh daily) …this will ensure that you don’t show up and become disappointed that the flavour that suits you best isn’t in!
Many people are confused and become overwhelmed with the daunting task of grooming and maintaining their eyebrows. They spend hundreds of dollars on waxes, shaping, and threading every year! Here’s a little 4 step guide that will help you down the path of saving money, and grooming those brows right from home!
In no particular order
1.) Use a pencil or tweezers as a guide and align it from the outer edge of your nose up toward your eyebrows. This will determine where your eyebrow should begin. Anything inward of this can be plucked.
2.) Use the same pencil/tweezers and angle it from the same edge of your nose and align it to the outer corner of your eye. This will determine the ending point (or how long) your eyebrow should be.
3.) To determine where the arch of your eyebrow should begin, use the same pencil/tweezers as a guide and, looking straight into a mirror, place your guide beside the outer edge of your pupil.
4.) Once you have determined where your brow should begin, end, and arch.. clean up the strays outside of these points to your desired eyebrow shape that best fits your face shape!
I have mentioned this colour in a couple posts now and just thought I would share my experience with it!!
I had been looking for a fresh, bold blue coloured polish for a while now and stumbled upon “In Prompt Blue” one day and thought I would give it a try. I have used Sally Hansen’s Insta-Dri collection many times before and I am more than satisfied with the product line as it really does hold up to its “insta-dri” name. With one thin coat it really does dry instantly, the second coat needs a minute or so longer, but nothing in comparison to OPI or other leading nail lacquer companies.
Now for the colour…
I am absolutely obsessed with the colour. The picture doesn’t exactly serve this colour justice, as it sort of appears to be similar to a cobalt blue, rather than a smoky royal blue I would like to call it? There is a grey, muted quality to the blue that I find looks really expensive and trendy compared to most bold blues that usually have a cheap, stark, electric hue that comes across kind of harsh against my paler skin.
All in all I couldn’t help but share my experience with this lovely new polish I have recently purchased, and hope some of you dare to give it a whirl as well!
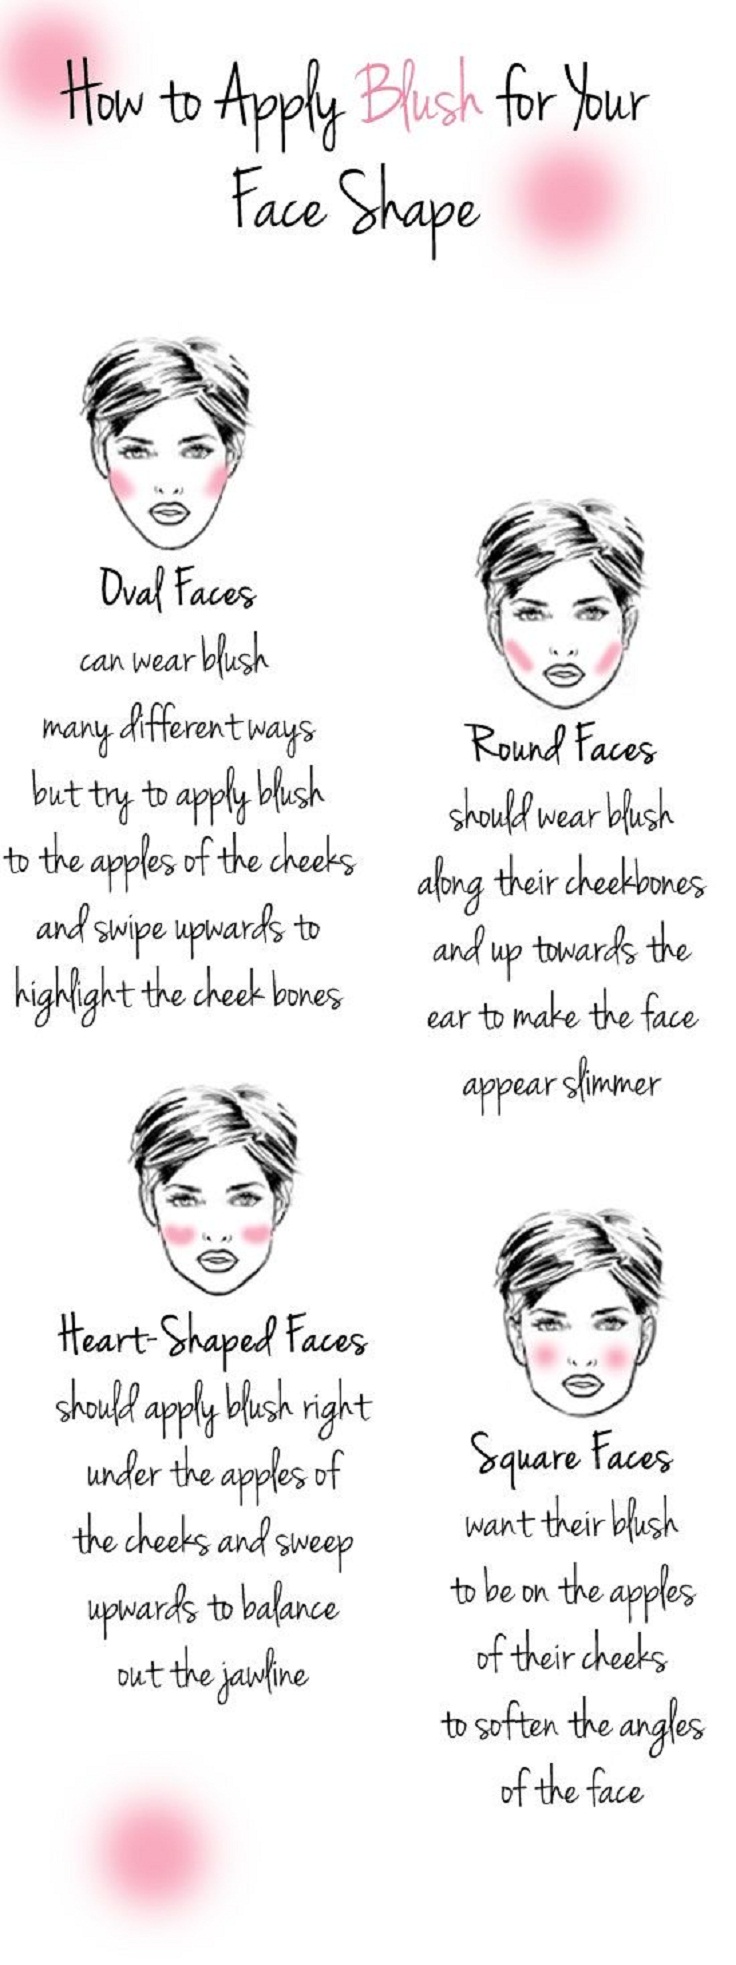
It is outstanding how many people know what face shape they have, but don’t know what to do with it! Knowing your face shape can help you pick out the right blush placement, eyebrow shape, hair style and even hair cuts!
An Oval face shape is the most ideal face shape. The face is longer than it is wide and the jaw is narrower than the cheekbones. An Oval shaped face can be divided into three equal parts. From the forehead to the brow bone, from the brow bone to the end of the nose, and from the end of the nose to the tip of the chin. This face shape had no dominant features, and because of it’s equal proportions, an Oval shaped face can pull of most hair lengths and styles!
Heart shaped faces have a very wide forehead, that tapers down the face to a narrow, very defined chin. The individual often has a widow’s peak hair line to give this face a true heart shape.
A Square face shape has very angular, sharp edges with width at the forehead and jaw. The jaw line has profound harsh edges and a defined square shape.
When it comes to beauty, there are “rules” that we have heard, either from media sources like magazines, beauty blogs, and television, or even from our peers and family members. It is time that we take a step back and really evaluate these rules and whether we should break them or not. Here is a fun blog post I found that highlighted 5 perfect examples of beauty rules that were made to be broken!
Yes. It is true. Miracles have been worked, and your hair can now be tied up without creating that unbearable permanent crease in your fresh do.
Okay, so at first I was extremely skeptical – and I mean extremely (I wouldn’t believe what I read in reviews, what I saw in Youtube tutorials, or even what my friends would tell me) but after receiving a hair tie for free from my friend I have been convinced. These things really work?! Yes, yes they do.
I always want to tie my hair up during the day to run around and get things done, but it ruins my hair for at night when I want to let it down and all I’m left with is a giant halo around my scalp from the hair elastic.
These things are so great! They come in many different colours and are super cool looking. I found mine at Sephora, but I heard Goody makes a set that you can probably pick up at Shoppers Drug Mart or Walmart. They’re a little pricey (for hair elastics). The Sephora pack I got (neutral) was $13 for 8, but they’re pretty durable, and unless you’re notorious for loosing them (which I can be guilty of from time to time) they should be able to last you for quite a while! They also don’t have a metal enclosure so you know what that means?! – No more damage to your hair!
Give ’em a try, let me know how they work for your hair!
Have you ever spent hours on your own manicure only to have your nails chip just a day or so later (sometimes even the day of!!) I have TONS of nail polish colours at home and found myself going to the nail salon (often picking out shellac colours I wasn’t even too crazy about) just to have a manicure that could withstand my daily routine! I have found a simple, cheap, effective solution to this problem that you can do right at home!
All you need is:
1.) UV/LED Lamp (I promise you these are so inexpensive and easy to find)
2.) A shellac/gel top coat (again, super easy to find – and so worth it!)
3.) Nail Polish Remover
4.) Cotton pads
5.) your favourite nail polish (:
The steps are easy!
1.) Paint your nails with your favourite nail polish. One coat, two coats, three coats, however many coats you like, you can paint them. But here’s the catch (c’mon there’s always a catch to great things!) You MUST let your nails dry for at least 8 hours before applying the next couple steps. I find the best time to do this is before bed. Paint your nails, put on a quick movie, and go to sleep. This will allow your nails to FULLY dry. I wont bore you with the details, but this is exactly what you need in order for the shellac top coat to cure properly to your nails!
2.) Coat your nails, just as your would with a regular top coat, with your shellac top coat. You want to make sure that you apply a thin coat to each nail (because remember this will harden and if the polish is applied too thick then your nail will look thick!) You also want to try and avoid getting the polish on your skin around the nails because, again, the nail polish will harden (once in the lamp) and it will be hard and stuck to your cuticles (think like nail glue!) I use OPI Gelcolor Top Coat, I purchased it at a beauty supply store on Kerr street in Oakville, but I know you can purchase it at many other beauty supply stores as well. You can also buy different brands. If you talk to the sales associate at the beauty supply shop that you go they will be able to point out the selection of shellac polishes that they have. Every shellac polish requires its own guidelines to cure (dry/harden) so make sure that you ask if it will work with whichever lamp you choose to purchase (UV/LED).
**Pro Tip** The great thing about the shellac polish is that you don’t need to worry about it drying as you apply. You can go back with the brush to perfect your nails time and time again without clumps or streaks because the polish doesn’t dry until under the lamp!
3.) Okay now the fun part! Your nails are polished and the top coat is on… it’s time for the lamp! First off, you can get these bad boys just about ANYWHERE now!! I ordered my clunker off of amazon.ca years ago, but they sell several of them at Shoppers Drugmart (which usually includes a section of shellac colours and top coats), and I’m sure I’ve seen select retailers like Walmart carry them as well! Back to business, your nails have the top coat on them, depending on your polish (will have a designated dry time) and lamp (UV takes longer than LED lamps) you place your hand within the lamp and wait. With my OPI polish and UV lamp I place each hand in for 2 minutes. And repeat step 2 & 3 one more time.
4.) Now that you have repeated this process twice it’s time to remove the excess. Excess?!? Yeah! You may think that once your nails come out of the lamp they should be smooth and dry, they are not. They will be sticky and you need to wipe this off (don’t worry it will not remove your pretty polish job underneath). Use a cotton pad and nail polish remover to smooth over each nail to remove the film left behind.
The lamp and the polish may seem expensive at first, but think of how much it costs to get your nails done at the salon each time, and how many manicures you will be able to give yourself now that you have the tools and steps to do so!
And that’s it! You’ve just given yourself a super easy shellac manicure at home! ENJOYY (:
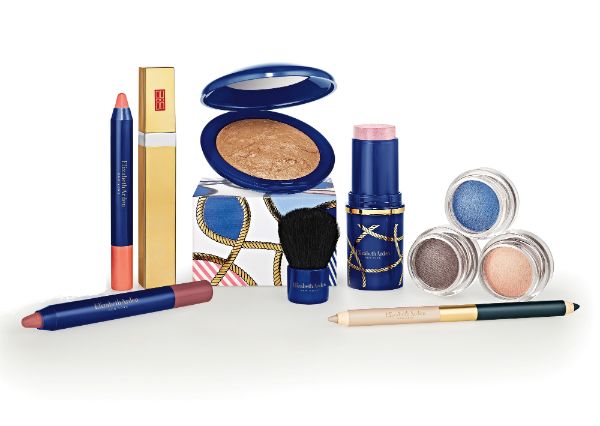
I was checking out some more beauty trends for this up-coming spring, and stumbled upon Allure’s spotted trends, and couldn’t help but remember a new spring line that Elizabeth Arden has just recently launched with many, many overlapping themes.
In one of my previous post (Make-Up and Nail 2014 Spring Trends) two other trend setting sites also seemed to point out some other trend elements that Elizabeth Arden has to offer with this collection as well.
Elizabeth Arden even offers two new nail lacquer colours that coincide with the trends from Harpers Bazaar with their Ahoy (trend: Orange Sherbert) and Sailor’s Girl (trend: Robin’s Egg Blue).
Looks like they’ve really hit the nail on the head this Spring! Interested to find out what other brands come out with! Let me know if you find anything worth looking into (:


